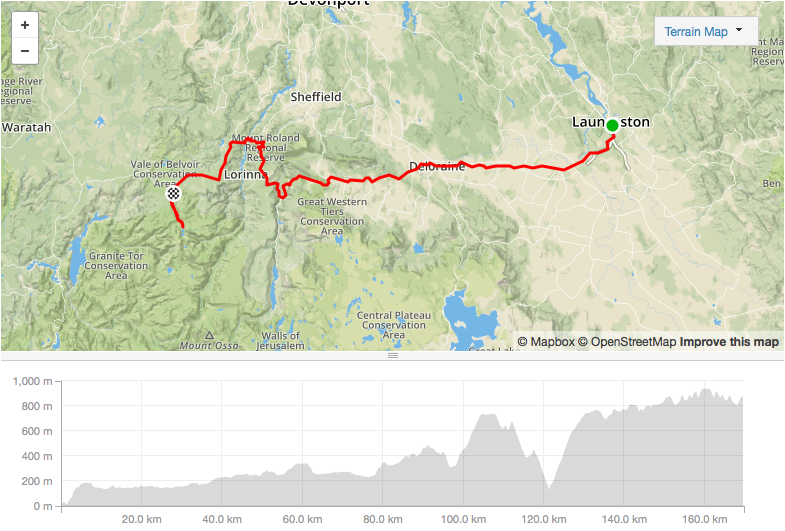
Heading south-west from our starting point, Launceston, we hit the first climb of the 2015 Ride for Fuel with the very gentle Cat 4 Wellington Street climb. Once over this little heart starter we head west for 80km of lightly undulating rural delights. The trap for young players here is to feel strong and to push the tempo to command the respect of your comrades. Trust me, you want to save your legs. At the 80km mark the A route continues west towards them there hills to take on the Cat 2 Echo Valley climb (7.7km @ 5.5%). The B route swings north and skirts Roland mountain, thus avoiding the hills. The two bunches meet at the junction of Claude and Oliver Roads before the long Cethana Road Descent. Of course what goes down must come up and the with no time to get the legs spinning again it’s straight onto the Cethana Rd Climb (aka Cathana Hell Hill according to Strava). This one’s going to hurt. It’s only 5km but at an average gradient of 9% it’s bound to take a heavy toll. From here it’s only 20km to our stop for the night but if you’ve got the hunger the A route goes past the comfort of a shower and refreshing beverage and all the way up to Dove Lake. A fitting reward for what will no doubt be a tough Day 1.

Day 2 Cradle Mountain – Strahan
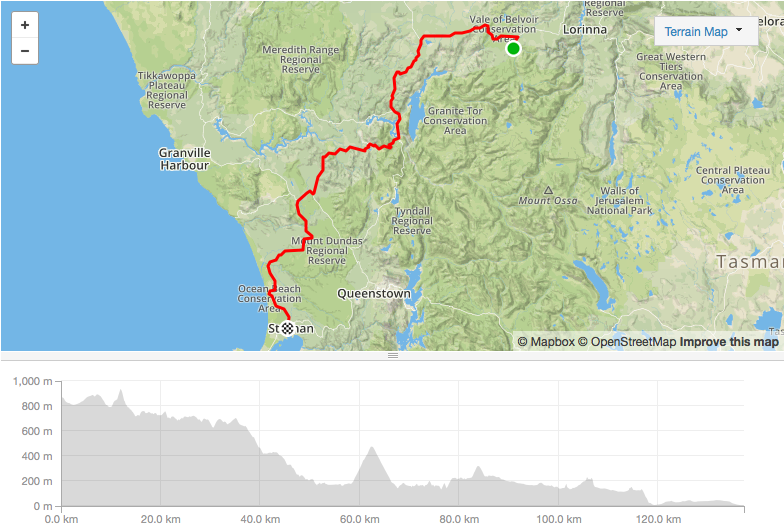
You can’t come all this way and not spend an hour or two adsorbing the splendor of Cradle Mountain National Park. With that in mind we have factored in a slightly later start today so everyone has time make the trip up to Dove lake. Today should be substantially easier than Day 1 as we continue towards the West Coast with what is a largely undulating downhill run. The day is punctuated with a number of small Cat 4’s with the only real test coming at the 60km mark with the ascent of the Cat 3 Mt Black (4.3km @ 7%). With the last climb of the day coming 30km from the finish there is ample time for a nice long cool down as we cruise into the Coastal town of Strahan.
Day 3 Strahan – Derwent Bridge
The only way is up and with a Cat 3 climb starting at km 0 the Lyell Hwy climb could be a rude awakening for your already fatigued legs. Once up on the plateau the road undulates for 40km until we reach the moonscape that surrounds the sleepy mining town of Queenstown. It’s here we hit the aptly names 99 bends Cat 3 climb (3.8 @ 7%)(although judging by the Strava segment I can only count 32 bends…). We descend down to Lake Burbury and after skirting the southern shores of the lake for 10km we continue east to our second Cat 3 of the day the Lake Burbury climb (3.6km @ 6%) at the 70km mark. After another 25km of beautiful rolling Tassie wilderness traversing the Franklin-Gordon Wild Rivers National Park we hit the last and most difficult climb of the day the Cat 2 Mt Arrowsmith (9.5km @ 4%). From the top of the climb it’s an easy roll down to Derwent Bridge for a another well earned shower and skim weak soy latte.
Day 4 Derwent Bridge – Hobart
Despite being the longest day of the 2015 Ride for Fuel Day 4 shouldn’t provide too many difficulties, especially considering it comes after the relatively short day 3. Starting out from Derwent Bridge we head east along the central highlands until the 40km mark where we drop down into the Derwent River Valley no sooner do we reach the Derwent and we encounter our first climb of the day the Cat 3 Tarraleah Climb (3.8km @ 7%) to the Hydro town of Tarraleah where we will regroup for morning tea. With only one Cat 4 climb and a few extended undulation to bother us the down hill run from Tarraleah to Hamiilton should see us reaching the last climb of the day with a spring in our step. At the 103km mark we pass through Hamilton and onto the Cat 4 Hamilton Exit Climb (3.3km @4.8%). From here it’s an easy roll down to Lunch at Sleepy Gretna. The last leg of the day sees us meander down the Derwent Valley with only a few bumps to punctuate the otherwise flat run. That is, unless you’re up for one more Cat 2 climb as the A route takes on Molesworth Rd (10.6km @ 3.6%, 2% for 6km then 7% for teh last 4km) at the 146km mark before swopping back down to the Derwent and into Hobart. Before you know it we will be back in the relative civilization of Hobart and for the art lovers amongst us there might even be time for a peek at M.O.N.A.!

Day 5 Hobart – Triabunna
On day 5 the B route get a sleep in! The riders who are still ready to rumble get the pleasure of taking on one of Australia’s most Iconic climbs. The mighty Mount Wellington serves up 21.3km of Hors Catégorie climbing goodness at an average gradient of 6%. The reward, apart from the billions of kudos you will receive on starva, is an epic view over Hobart and the Derwent. From the summit we head south to Kingston before following the banks of the Derwent back to Hobart for a well deserved coffee and a chance to give the B route brigade a ribbing about sleeping in! The second leg of Day 5 sees us crossing the Derwent via the Tasman bridge followed shortly by a crossing of Pitt water via the 4km Sorell Causeway. We continue through rural Eastern Tas encountering a 3.4km Cat 3 climb at 100km and a Cat 4 at the 110 mark. At the 118km mark we stop for lunch at the world famous Tasmanian Bushland Garden for lunch. From here it is a very easy run following the Prosser river to the sea. We head north along the coast for a few kilometers before arriving at our destination, the coastal resort town of Triabunna.

Day 6 Triabunna – Coles Bay
What, only 800m of climbing. Surely I jest. No, with only one Cat 3 to contend with this is by far the easiest day and if you took on Mount Wellington on Day 5 this is probably going to be an answer to prayer. The reduced length is with very good reason; the aim of today is to get to Coles Bay with plenty of time to Explore the third of our iconic Tassie destinations, the Frycinet Peninsula.
We climb gently for the first 10km out of Triabunna before meandering along the coast until our morning tea stop at Swansea. 20km after morning tea we hit an unnamed Cat 3 that rises to the dizzying heights of 180m. From hear it’s a down hill run for a few km and then the road undulates around Moulting Lagoon, past the Coles Bay conservation area and to our destination Freycinet National Park. It’s a 1.5 – 2 hour round trip to get to the Wineglass Bay lookout but from all accounts if you still have some fuel in the tank it is well worth the effort.
Day 7 Coles Bay – St Helens
A – 162km 1571m www.strava.com/routes/688200
B – 115km 830m www.strava.com/routes/865483
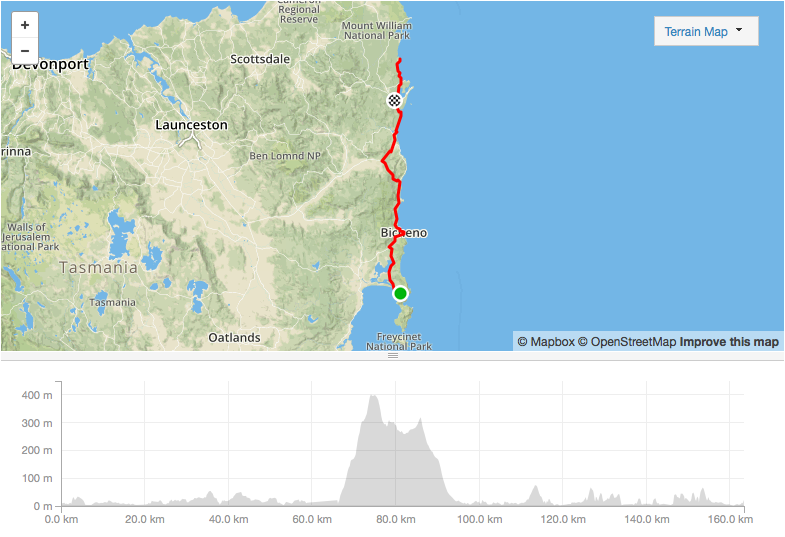
Today will no doubt be another absolutly picturesque day as we head north up the East Coast from Coles Bay to another Iconic Tassie location, the Bay of Fires. The first 66km is more or less flat as we hug the coast with the altitude topping out at 51m. At the 66km mark the A route swings inland briefly to take on the Cat 2 Elephant Pass Climb (8.3km @ 5%). the B route continues along the coast and rejoins the A route at the 93km mark and both groups stop for lunch in Scamander after 100km. 20km later we reach our destination for the night St Helens. From here we continue up the coast for the 10km until we reach the Bay of Fires. The road contunies north following the bay of fires for another 10km before we do a u-turn and head back to St Helens. While the altitude rarely gets above 50m along this stretch it looks like there are lots of little pinches so keep some fuel in the tank for this one too.

Day 8 St Helens – Launceston
160km 2458m www.strava.com/routes/688204
Time to bring it home with a wet sail. After a quick 3km warm up we hit the first little bump of the day the Cat 4 St Helens Exit climb (1.8km @ 5%). The first leg of todays route has been refered to as 60km of Rapha commercial. You’ll be able to just soak in the first 30km but then the real action starts and there will be a whole lot of Froome-esque looking at stems as we hit the Cat 2 Blue Tier climb (7.9km @ 6%). After the climb it’s all downhill to our break in Moorina at the 54km mark. The second leg looks easy enough on paper with only two Cat 4 climbs but word on the street is that it’s a festival of little climbs. At the 100km mark we reach our lunch stop, Scottsdale. After lunch we have 10km to get the legs moving and the food digested before we hit our last challenge of teh 2015 ride, the Cat 2 Sidling climb (6.3km @ 6%). From the top of the climb at the 117km mark it’s all down hill! Time to sip champaigne and play up for the TV cammeras as we head to the Tassie equivilant of the Champs Elysee, Le Rue de Saint John.