
Radelaide – Postponed for 2020
It is with a heavy heart that we are postponing the 2020 Ride for Fuel road ride until there is more certainty around the COVID situation.
With awesome climbs, sweeping descents, beautiful scenery, a thriving foodie scene, and world-class vineyards on its doorstep, it’s no wonder Adelaide is regarded as Australia’s best cycling city. Join us for 6 days exploring this must-ride destination and find out why they call it Radelaide!
Day 1
Hills & Beaches
159.07km
2294m
Freeway (1),
Paracombe (4),
Shepherds Hill (3),
Ackland Hill (3),
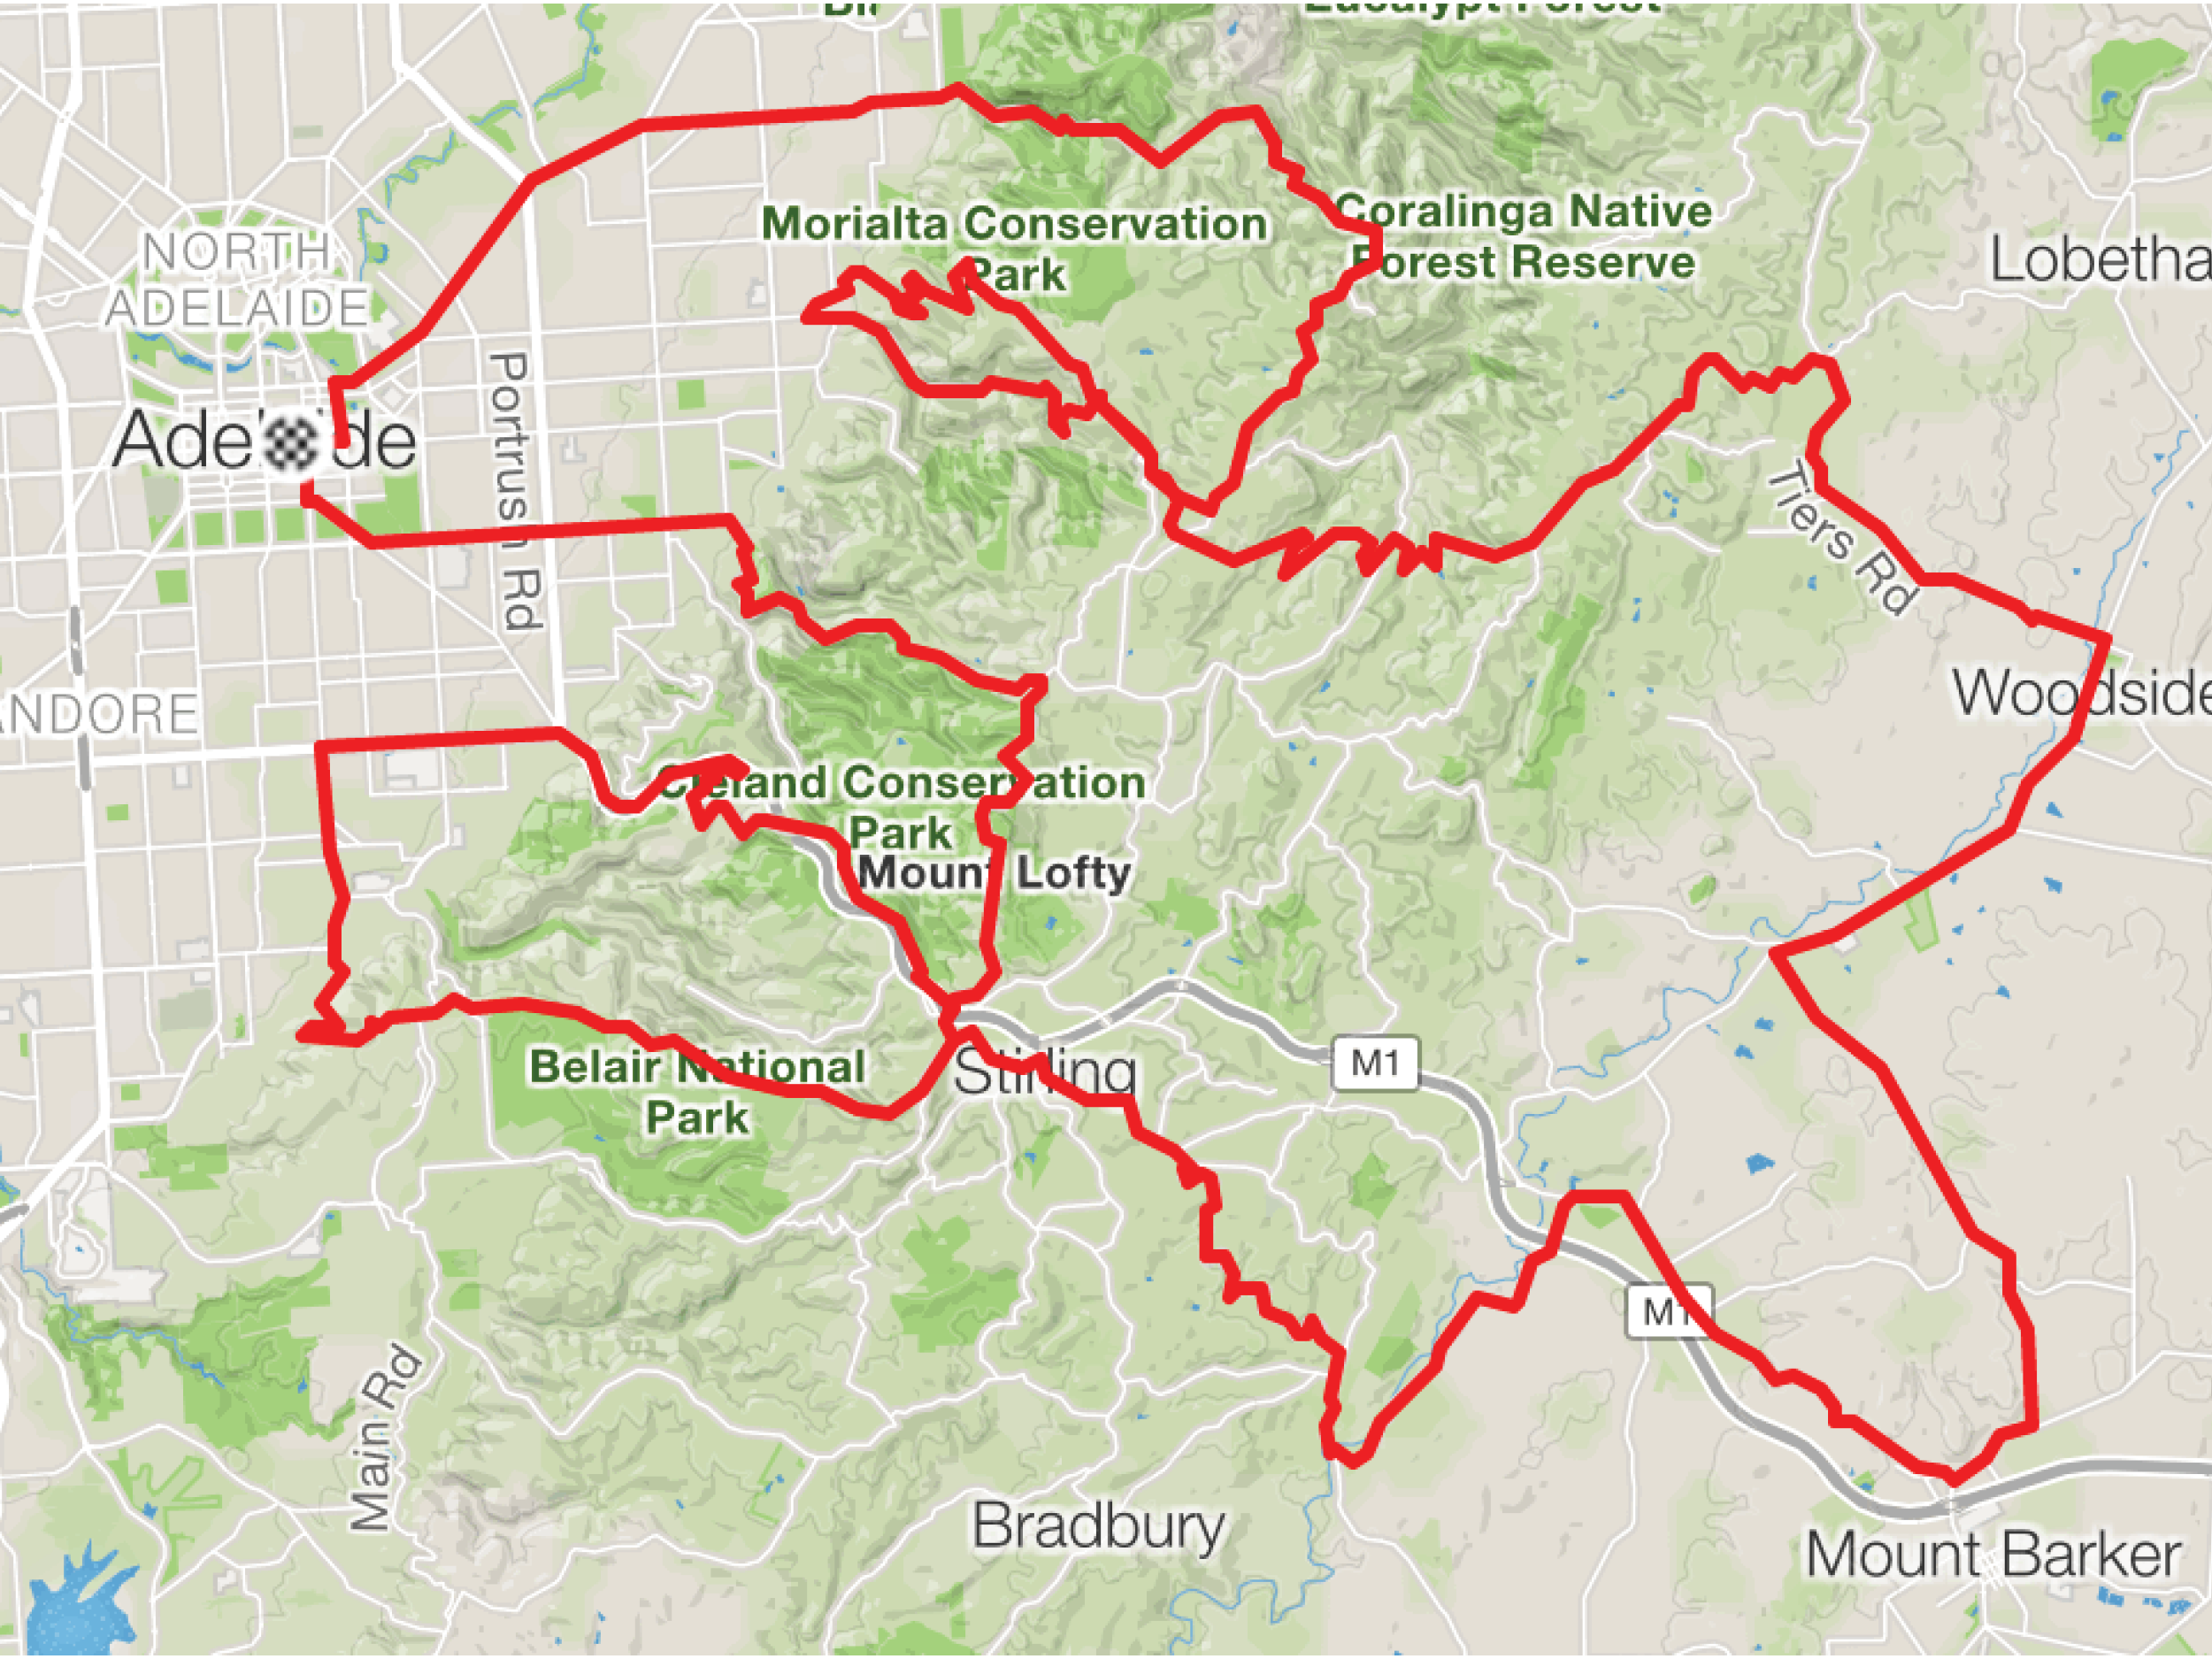
By the end of Day 1, you’ll have a great feel for the city and surrounds and no doubt have a first-hand appreciation of why Radelaide is such an awesome city for lovers of lycra. As with the route for every day of this year’s road ride, we start with a perfect warm-up that tends up after a few flat kilometres before we hit the bottom of the Lofty Ranges and our first climb. It would be rude not to start with one of the classics so we’ve chosen the fabulous Mt Lofty via the Old Freeway (Cat 1 16.6 @ 4%).
From the summit of Mt Lofty you get a great feel for the city and surrounds. After a quick snack we head inland to the Adelaide Hills descending down through the beautiful countryside to Balhanna and north to morning tea at Lobethal at the 48km mark. We then descend to Cudlee Creek and down the Torrens River Gorge before we hit the short but sharp Torrens Hill Rd Climb (Cat 4 1.2km @ 9.4%) to see if you can take the KOM from some Richie P. bloke (2.47 in case you want to give it a crack…). We then swoop back down into the Adelaide Basin and across the north of the city to the beach. Hugging the coast we head south until lunch in Glenelg Beach at the 110km mark. We then scoot east across the south of the city and up the range for the second time, taking on Shepherds Hill (Cat 3 5km @4%) and Ackland Hill (Cat 3 2.7km @ 7.9%) in very quick succession before descending back into Adelaide for a well-earnt vanilla slice.
Freeway (1),
Paracombe (4),
Freeway (1),
Paracombe (4),
Freeway (1),
Paracombe (4),
Freeway (1),
Paracombe (4),
Freeway (1),
Paracombe (4),

Day 2
Radelaide Hills Classique
151.23km
2910m
Montacute (2),
Norton Summit (2),
Basket Range (4),
Aldgate Valley (4),
Belair (2)
We got a little Hills hors d’œuvre on Day 1 and today we’re taking on the main course with the Queen stage of Radelaide with almost 3000m of climbing! Day 2 is all about the Adelaide Hills as we take in 5 of the must-ride climbs of the region. We start with Montacute (Cat 2 7.2km @ 5%) which, thankfully, starts easy and gradually ratchets up the %. Now that your legs are warm, it’s time to take on a climb much loved by the croweaters, Norton Summit (Cat 3 5.5km @ 5.2%). Then, to complete the AM session trifecta we ride up Basket Range (Cat 4 2.6km @ 5.8%) before winding into another picturesque Hills town, Lenswood, for morning tea.
Thankfully, the legs will have a few hours to recover as we head south through the Hills with only a few little pinches to punctuate the route. We head west from Mt Baker and meander up the Aldgate Valley (Cat 3 7.7km @ 2%) which is more of a scenic false flat than a climb, to lunch in Stirling.
After lunch, we descend the Old Freeway then head a few kilometres along the base of the range and take on our last climb of the day, Belair (Cat 2 11.3km @ 4%) which sounds friendly but the profile makes it look anything but with the gradient jumping all over the shop. What better way to cap off the Queen stage than with the best descent in S.A. and possibly Oz, Greenhill Rd.
Freeway (1),
Paracombe (4),
Freeway (1),
Paracombe (4),
Freeway (1),
Paracombe (4),
Freeway (1),
Paracombe (4),
Freeway (1),
Paracombe (4),
Day 3
Barossa
123.25km
1910m
Ansteys Hill (2),
Kersbrook (3),
Checker Hill (4),
Menglers (3)
After yesterday’s big hits you might be tempted to ask yourself why you didn’t just come to SA for a nice leisurely wine tasting holiday… Thankfully, Day 3 will come to the rescue! While there are still some beautiful hills on today’s route, we’ve cut both the kilometres and the altitude gain down to carve out a little wine tasting in one of the world’s premier wine regions, the Barossa Valley.
Heading out of the city to the north-east we work our way towards Ansteys Hill (Cat 2 8.8km @ 4%) which should give you a chance to get the legs spinning again and find your rhythm. We descend for 10km before the relatively short and easy One Tree Hill (Cat 4 1.8 @ 6%) before dropping again to our last climb of the AM session, Kersbrook Hill (Cat 3 4.5km @ 4.2%) bringing us to morning tea in Kersbrook. Next on the menu is a TDU staple, Checker Hill (Cat 4 3km @ 5%) which looks easy enough but the 500m stretch of 15% in the middle makes it more of a test than you might imagine. It’s smooth sailing from the top of Checker as we drop down into the Barossa. We jump on the Jack Bobridge Track (aka Barossa Bike Path) for a cruisy roll to lunch in Tanunda.
We finish off the day with another TDU favourite, Menglers Hill (Cat 3 2.7km @ 6%) before rolling into Nuriootpa for an early finish and an afternoon of wine tasting!
Freeway (1),
Paracombe (4),
Freeway (1),
Paracombe (4),
Freeway (1),
Paracombe (4),
Freeway (1),
Paracombe (4),
Freeway (1),
Paracombe (4),

Day 4
Murray, Present
206.86km
1553m
Angaston Bike Path (4),
Palmer Hill (3),
Greenhill East (3)
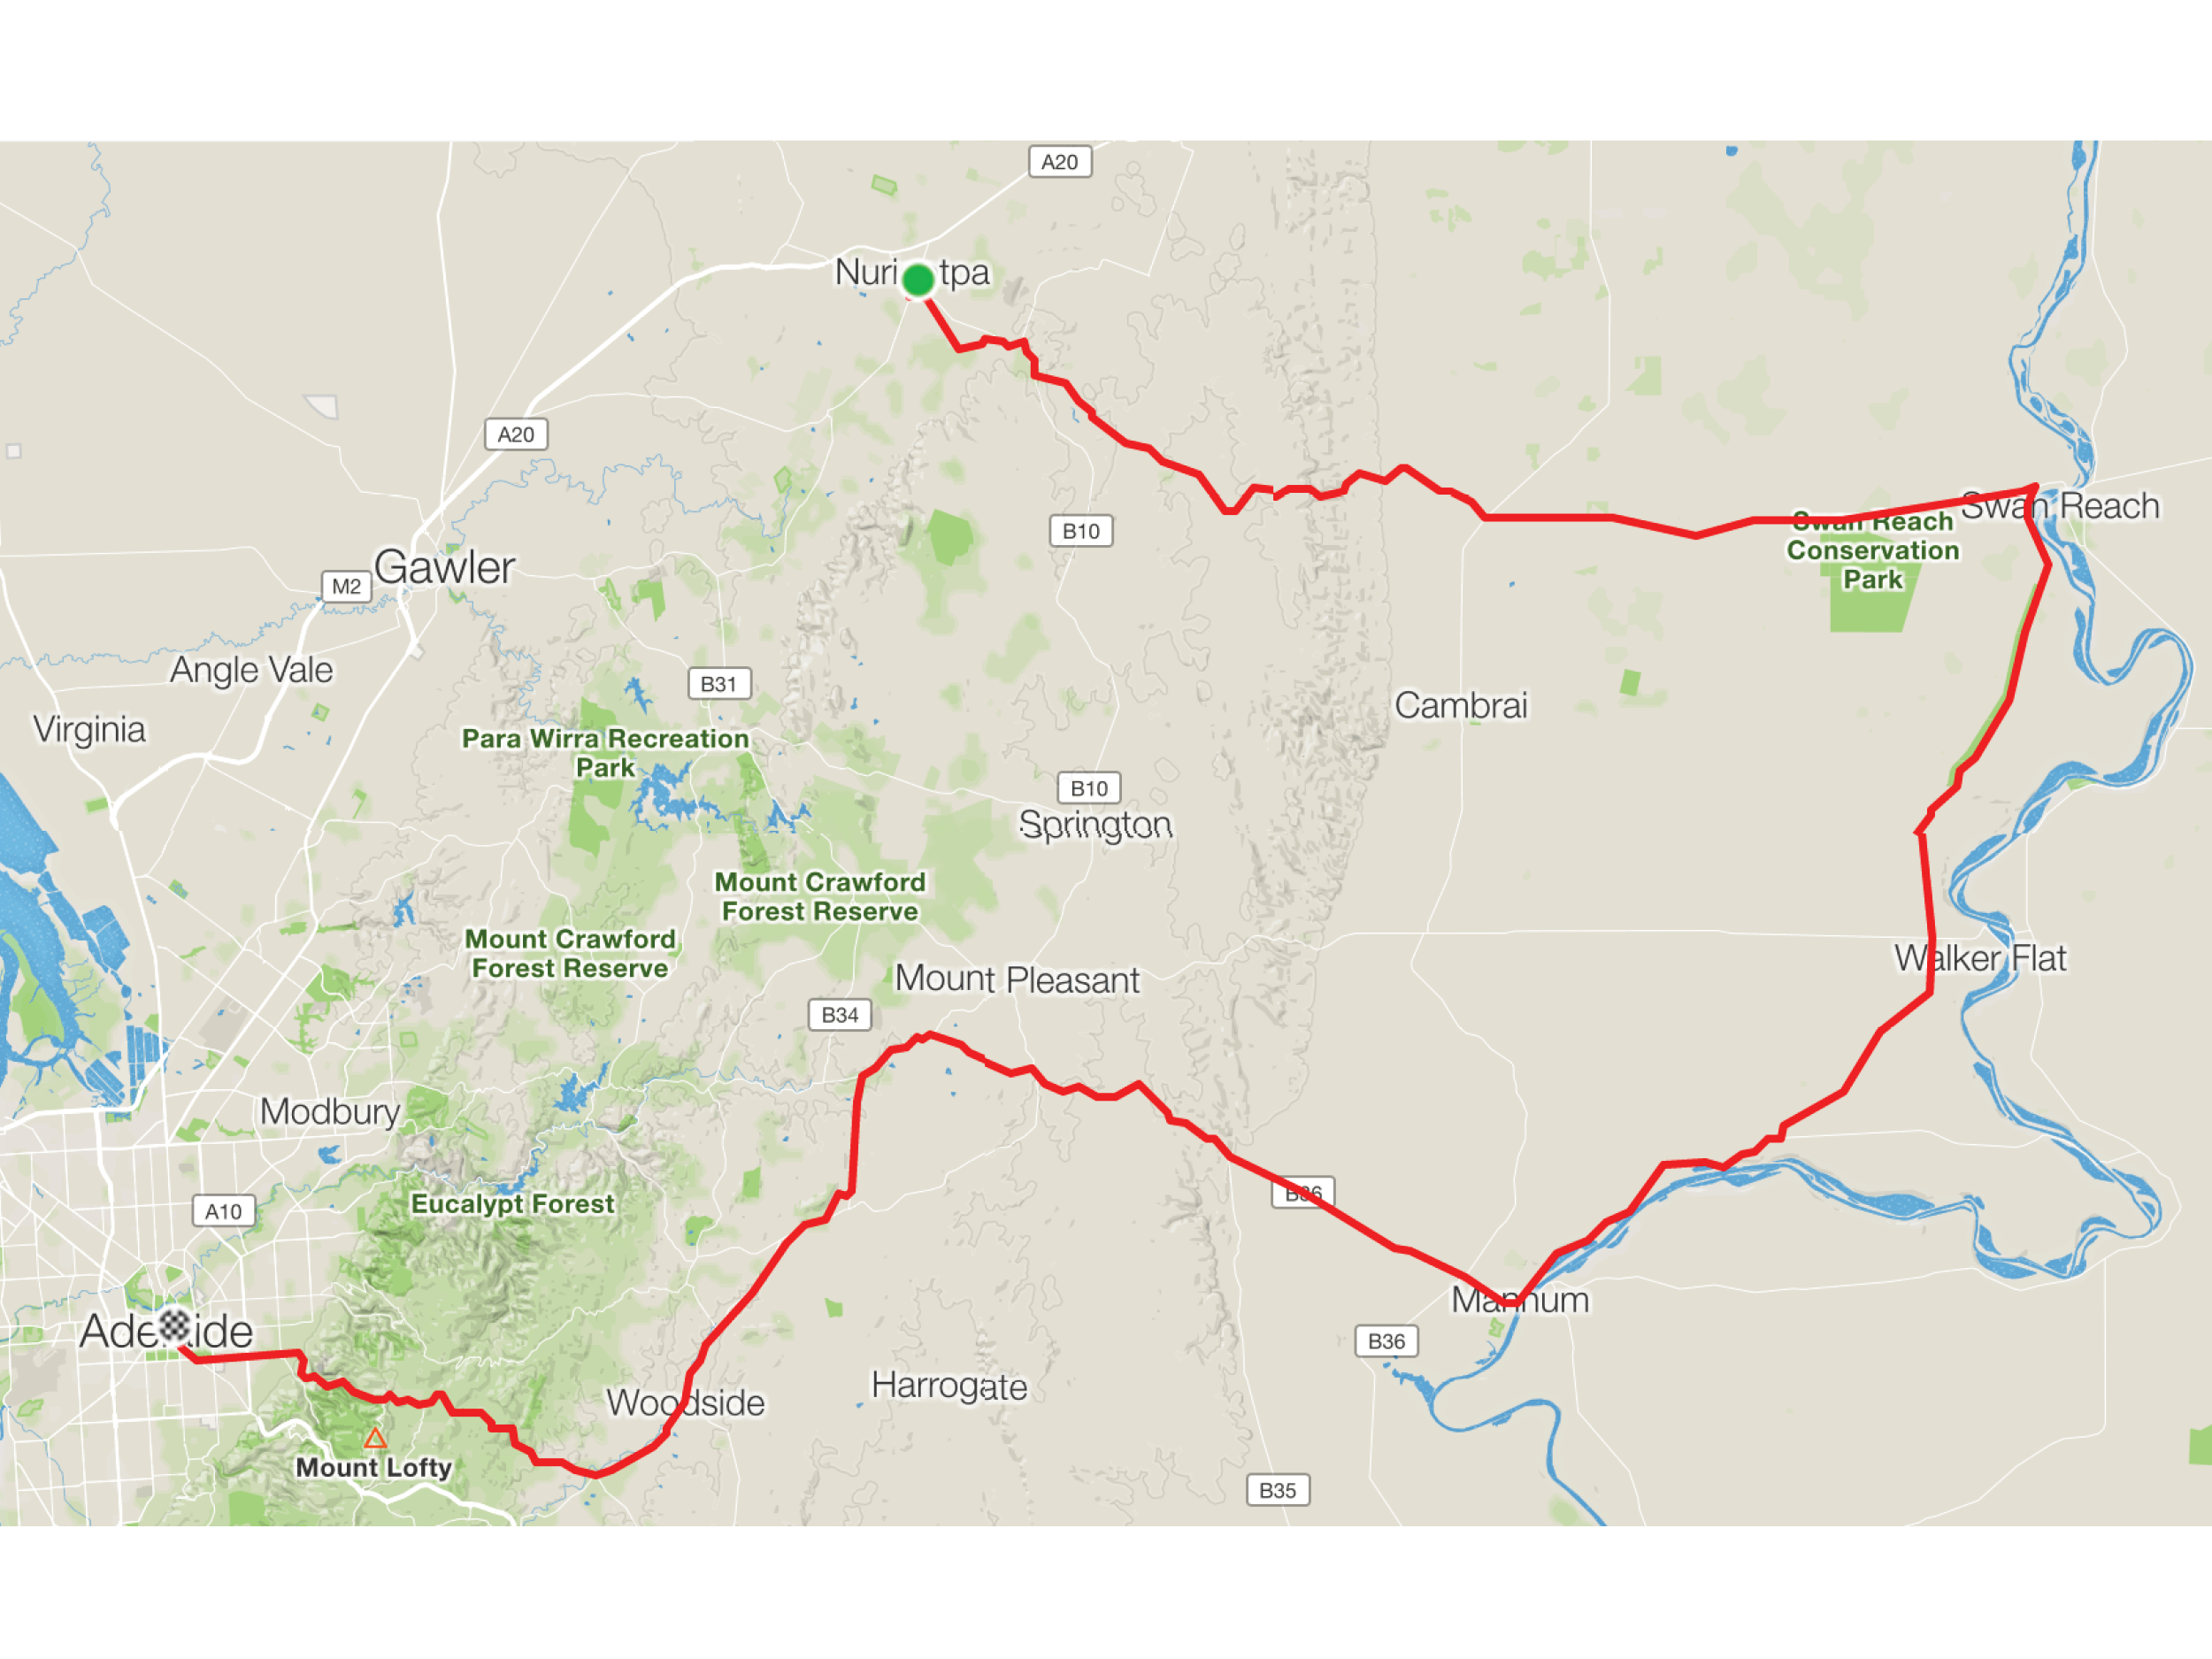
Day 4 is the longest stage of the Radelaide tour at over 200km but it should give us a good chance to get a bit further afield to check out the inland. We start with a gentleish climb out of the Barossa via the Nuri-Angaston bike path before the long downhill run to the Murray River at Swan Reach for morning tea. We mount up again and head down the river to Mannum before the road tilts up and we start the journey back towards Adelaide.
The first real challenge we encounter is Palmer Hill (Cat 3 6km @ 4%) before we regroup at Birdwood for a well-deserved lunch. After lunch, we follow the range south before turning west for one of my favourite roads, Greenhill which is a beautiful 14km drag back up to the top of the range before the now-familiar swoop back down into town. It’s a long day but unless the weather is against us, it should be an absolute cracker and not too hard on fatigued legs.
Paracombe (4),
Freeway (1),
Paracombe (4),
Freeway (1),
Paracombe (4),
Freeway (1),
Paracombe (4),
Day 5
East of the Hills
129.84km
2126m
Corkscrew (3),
Knotts Hill (3)
Today we’re taking care of some unfinished business east of the range. We depart the Adelaide plains via the easiest but highly scenic route up Gorge Rd. After a 20km warm-up, we hit the scene of many a TDU battle, the infamous Corkscrew (Cat 3 2.4km @ 8% (1km @ 11%)). We chuck a U-turn at the top and drop back into the gorge to continue our jaunt east, stopping at Gumeracha for morning tea. We continue East until Mt Pleasant before swinging south and then west again. We gradually gain altitude for most of today’s ride but after Mt Pleasant things get a little lumpier. We hit a cheeky Cat 4 at the 75km mark before lunch at Mount Torrens.
After lunch, things ratchet up a little with the Lobethal Rd (Cat 4 2.3km @ 4.1%) and Knotts Hill (Cat 3 2.7km @ 8.1%) climbs bringing us back to the top of the range for one last hit of Greenhill before the easy roll into the city.
Freeway (1),
Paracombe (4),
Freeway (1)
Paracombe (4),
Freeway (1),
Paracombe (4),

Day 6
King of Old Willunga
155.67km
2212m
Greenhill/Lofty (2),
Old Willunga (3)
We finish the week off with the quintessential TDU ride, a time trial up one of the best climbs in Adelaide followed by a downhill run to McLaren Vale to see who is the RFF King of Willunga!
By day 6 you’ll have a pretty good feel for the Lofty Ranges and particularly Greenhill rd which we will have come down a few times already. Today we get to climb my favourite, and the highest climb in the range, Mt Lofty via Greenhill rd (Cat 2 12.3km @ 5%) finishing at the Mt Lofty lookout and taking in the wonder that is Radelaide in all it’s glory for the last time.
After a quick snack and obligatory team photo, we head down the range to the south for 60km of beautiful descending through the Southern Adelaide Hills to McLaren Vale and on to our morning tea stop at Aldinga Beach. We then work our way back inland to McLaren Vale for our last KOM of the ride and it’s a cycling icon! Relive Richie’s heroics as you try to claim the King of Old Willunga Crown (Cat 3 3.6km @ 7.1%). We loop back down to McLaren Vale for lunch amongst the vines before jumping on the Coast to Vines rail trail to spin out the legs and reminisce about what a great week you’ve had.
Freeway (1),
Paracombe (4),
Freeway (1),
Paracombe (4),
Freeway (1),
be (4),
Freeway (1),
Paracombe (4),
