Giant Slayer
For the 5th edition of the Ride for Fuel we’re heading to one of Australia’s most picturesque and challenging cycling locations, the Victorian Alps. With a route designed to minimise filler and maximise thriller, we take on 6 of Australia’s top 30 HC climbs and at the end of the day we get to kick our feet up in top notch accommodation in the beautiful towns of Bright and Falls Creek. While slaying giants isn’t for the faint hearted, with three routes to choose from the Giant Slayer should suit most avid cyclist. Time to lock in your leave and get training!
You’ll notice that the following route guide describes the A and C routes but has no mention of the B route. Without being too prescriptive, the B route is whatever the bunch wants it to be. It could be following the A route on some days and the C route on others. It could also mean doing the A route but not at the same pace as the A bunch.
Day 1
Wodonga – Bright
A Route: 150km 2200m
C Route: 109km 1275m
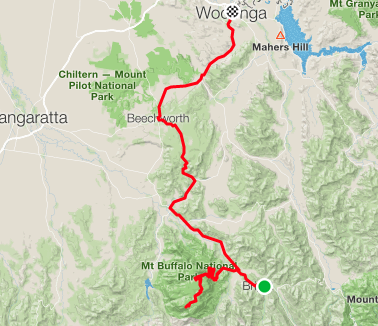
Day 1 of the 2018 Ride for Fuel sees us head south from the Murray River Valley as we make our way through the gorgeous valleys and foothills of the Victorian Alps. It isn’t long before the river valley gives way to our first little climb at the 10km mark as we encounter the Cat 3 Honesty Hill (8.4km @ 2.6%). As if an allegory for what lies ahead, Honesty starts with a false flat and gets harder as it goes on, culminating with the last km hovering in the 10% zone. After a few little punchy aftershocks we spin the legs out for an easy 10km before the next test is upon us. The Cat 3 Las Serena (2.3km @ 7%) should give us a chance to well and truly get the pistons pumping before our Morning Tea overlooking the Lake in Beechworth at the 42km mark. After the break we have 10km of false flat that brings us to Stanley and then a steep twisty descent that drops us into the next valley. Here you have the choice of either following the Ovens river directly to Bright for a pub lunch or Heading north over Tunnel Gap (1.5km @ 4%) before a lovely lunch provided by our Foodies at the 92km mark. After lunch its an easy cruise (excluding one little 800m pinch…) down the Kiewa Valley before we hit the first real test of this years ride, Tawonga Gap (7.5km @ 6.3%) which provides cracking views over the Kiewa valley and a consistency that would make the finest civil engineer proud. From Tawonga Gap it’s an easy and fast run down to the Ovens Valley and a frosty one at Bright Chalet!

Day 2
Bright – Falls Creek
A Route: 123km 2450m
C Route: 65km 2265m
It’s Giant Slaying time! Heading north through the beautiful town of Bright we follow the Ovens river until we turn off the Great Alpine Rd at Ovens. After a quick snack at Ovens we head up Happy Valley and onto the hors d’oeuvre of the day, the blissful Cat 3 Rosewhite Gap (4.3km @ 4.2%). After a quick descent we rejoin the Kiewa Valley Highway and retrace part of our Day one jaunt to reach Lunch at Mt Beauty (which is in a valley)(might be one of those Greenland things…). It’s here that we rejoin our C route brethren for to refuel and talk tactics. After sitting around for a while contemplating the task ahead and waiting for lunch to digest, we embark on the first of our HC giant, Falls Creek (31.9km @ 3.9%). The Falls climb is really a story of two halves. The first 16km has some steady sections but is also punctuated by descents that will have you wondering why the road builders didn’t just make the whole thing a perfect 3%. From the 16km mark on it’s pretty much a perfect 16km of 5-8% with views that get better with every turn. As we climb ever higher the vegetation changes and you get a real sense of what the Alps is all about. In the last few km we pass through Fall (and our accommodation) but the fun doesn’t stop until we reach the dam wall above the resort, look back down the valley and marvel at the giant we have just slayed. After a quick roll back down to the resort it’s time for a lazy cafe recovery session as we prep for the queen…

Day 3
Falls Creek Rtn
A Route: 163km 3510m
C Route: 82km 1777m
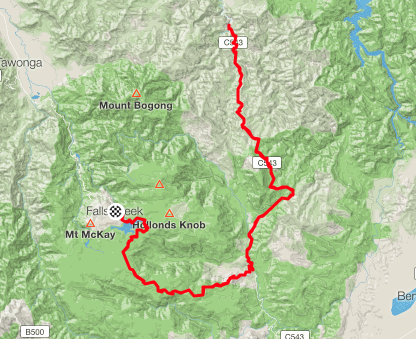
Day 3 is the Queen stage of this years Ride for Fuel and one that I’m VERY excited about! Not only are we slaying one of Australia’s most notorious HC climbs but we’re also taking on a future classic. Heading off around the Rocky Valley dam, we spend the first 18km traversing the stunning Bogong High Plains before dropping very rapidly into the Glen Valley. Those that have not studied the route map may well be counting their lucky stars that they are descending not ascending. Those that know what lies ahead may be questioning the sanity of riding down a hill just to ride back up it. After a few flat km we stop for a quick snack before taking on the Télégraphe & Galibier of the Vic Alps, the Cat 2 Mount Willis northbound (18.2km @ 3.4%). While the stats sound reasonable, this double banger will take some beating. After a long beautiful sweeping descent on a road that was only sealed in 2014 we have morning tea at Lightning Creek at the 81km mark before hooking around and starting the long grind back to Falls. The future classic HC climb Mount Willis Southbound (21.9 @ 4.3%) has the handful of riders that have tasted it’s rare fruits raving about this sleeping giants awesomeness. After a 20km descent we arrive back at Big River for a well deserved lunch. Then it’s on to what will probably be the nastiest climb of this years ride, The HC Back of Falls (18.4km @ 4.5%). On paper other climbs look like they rival this nasty little hill but keep this in mind; the first few hundred meters will put you straight into the red, the next 5km will ensure that you don’t leave the red, the roads are pretty straight so it will test your fortitude and, as is normally the case due to its remote location, we will be taking on this climb with plenty of kms in the legs. You have been warned. Take heart, once you break the back of it at the 5km mark things get decidedly easier. As long as you’ve got gas in the tank all you need to do is keep pedaling and you’ll conquer this beast. We finish off the day with another postcard perfect cruise across the Bogong High Plains before arriving back at Falls Creek. You will love this day.
Day 4:
Falls Creek – Bright
Route: 184km 2965m
There are no shortcuts on Day 4 and coming after the Queen stage it’s going to be the toughest day from the shoulders up. Fortunately we are net – 1500m of altitude so there is more down than up! We start off retracing the first 37km of Day 3 before busting right at the bottom of Falls to follow the Big River for 30km along the beautiful river valley. Then it’s a lovely descent into the Omeo Valley and another flatish 10km before morning tea in Omeo at the 77km mark. The struggle becomes real after our break as we slay the longest of this years HC giants, Dinner Plain (56.5km @ 2%). This climb is more like a series of Cat 2, 3 & 4 climbs in quick succession with plenty of false flat thrown in to keep you engaged. The main sub-climbs to watch out for at the Cat 2 Omeo climb at the 79km mark (7.2km @ 6.2%) and an unnamed Cat 3 at the 84km mark (4.4km @ 6.5%). Rather than stopping at Dinner Plain, we’re continuing to the true KOM at the top of Hotham before doubling back into the Hotham Village for a well deserved lunch. From here it’s an easy run down Hotham to Harrietville and then along the Ovens River Valley back top Bright. It can get pretty hot in the valleys in the afternoon and the lure of the beautiful ovens River has proven too much for one RFF rider in the past, stopping for a 10 minute soak in the therapeutic waters before remioiunting for the spin out back to town.

Day 5
Bright Rtn
A Route: 134km 2730m
C Route: 106km 2170m
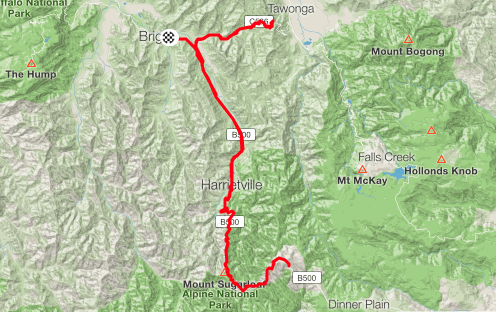
After yesterday’s marathon effort we needed something to help shake off the fatigue and get the blood pumping! Day 5 is an out and back so, to some extent, it’s a choose your own adventure. Starting from Bright, we retrace to last 50km of yesterdays journey to take on the tallest of our giants, Mount Hotham (29.9km @ 4%). With 1303m of altitude gain and topping out at 1841m Hotham will test your limits and while we traverse the summit a number of times, todays effort is the more noted making it the Cima Coppi of the 2018 route. Hotham needs to be digested in three courses. The first 10km are a pretty consistent 6% with two notable exceptions, the first 500m is closer to 10% and at the 5km mark you hit The Meg… it’s only 200m but this 12% pinch will force you to dig deep. After the 10km mark there is about 8km of false flat to get some energy back and then it’s time for dessert! The last 10km, all of which is above the 1500m mark where altitude starts to become a real factor, has a number of ramps that will hurt a lot. The most savage of these comes at the 22km mark and sits above 10% for 800m. Just when you feel you’re getting close to the top of the ridge-line you drop 60m making the last 2km a 10% grovel until you pass through the tunnel and breath a reduced oxygen sigh of relief. After a regrouping at Hotham Village we head back down and at the 100km mark we swing right into Germantown for lunch on the banks of the river. For those that have had enough, it’s a 4km roll back to Bright. For the A bunch, we turn right to tick off the western ascent of Towonga Gap (Cat 2, 5.8km @ 7%) before rolling home to Bright.
Day 6
Bright – Wodonga
A Route: 108km 1840m
C Route: 100km 1520m
Just when you thought the fun was coming to an end, we go and save the best for last. That’s right, you’ve conquered the longest and the highest but our final giant to slay is this rider’s favourite. Saying goodbye to our stellar hosts at Bright Chalet we head north for the last time through Bright for 10km of easy warm up before things get real for the last time. We hit a little Cat 4 pre tremor at the 10km mark (1.4km @ 6%) dip down for a km and then we’re on one of the nicest roads in all of Oz. The Mt Buffalo climb proper is 18km @ a very consistent 5.6% which is just in the sweet spot for the big diesel engines who love a vertical challenge. The views are spectacular as you cling to the side of the mountain high above the Ovens Valley. While the Buffalo climb rates a HC in it’s own right, this is only part of the story because we’re on a mission to the top! We’re heading for the Horn (30.2km @ 4%). Beyond the 18km mark The climb flattens out for a few kms as we pass through the base of the ski resort. It then kicks again with a 4km then a 3km drag up to the end of the paved road at The Horn lookout. The reward of the view alone warrants the punishment, not to mention the feeling of satisfaction you’ll gain from slaying 6 of Australia’s premier HC giants. After regrouping for a quick snack and the obligatory selfie at The Horn, it’s back down to Porepunkah for morning tea with the full crew at the 80km mark. After the break we spin out the pain for 35km as we head down the Ovens River Valley, Through Myrtleford to the base of our final battle up the Cat 2 Stanley Rd Climb (10.7km @ 5%). Sounds pleasant enough until you notice the segment named “Dig Deep for Real Pain” which denotes a 1.2km section that averages 11% and tops out at 29%! I’m hoping that that’s a Strava glitch… Thankfully from here we break for lunch for the last time before rolling back into the Murray River Valley for a very well deserved frosty one. Job done!